Saturday, December 31, 2011

New Years Resolutions

Funny how the new year always makes one start thinking of things they want to change or do differently as another year begins.

I've been thinking about the new year and what I would like to tweak a bit and resolve to do.

1.Exercise. Yes, don't we all do this every year! Mine isn't so much for the weight loss (I won't complain if I lose a pound or two) but to make exercising a habit and to keep in shape. Having babies puts you out of shape real fast. I could find all kinds of crafty things to do or web sites to spend time oohh and aahh-ing over instead of exercising. My plan is to start by exercising 1 day per week until it's no longer a chore. Then adding another day, until working up to 3 times per week. I feel this is something I can commit to and not set myself up for failure. 

2. Budget. In our house my husband works construction which means seasonal work. That plus me not being a good saver, means that it has been feast or famine in this house. Now with 3 kids, not really the way we want to live. I'm not the one who spends on big ticketed items but rather buying little things here or there. I am sucker for a good deal, (even if I don't need it!) and buy on emotion. When I go to the craft store I might add $5 to $20 extra per visit. That added up through out the year gets to be a lot. Then on the other side of it I have a room full of good deals. I do roll my money back into my crafts. Sell something = buy more. But I'm pretty sure I have WAY more than I will ever need. 
Pencil in need self control here.
I would really like to prove to my husband that, yes indeed we can make a budget and I can stick to it. We were talking before he left to sit down together and come up with a budget. Have a regular weekly grocery amount, a regular set amount that goes into the winter fund (the regular utility bills, food & fuel for the vehicles) and also the emergency fund (the unplanned expenses, i.e. car repairs, broken water softener, etc.). Since we only get 1 hour to talk a day right now, I'll have to sit down & do some homework. Then we can together see what is needed and what is extra.
I'll take any advise your willing to offer and give it a whirl. I've tried some things that others have done. Some have worked while others haven't. 
I want to get this figure out for real this time! Yes, I do know that we will never be as prepared as we want to be. But I want be able to enjoy life while living debt free.
Do you budget? What do you do?

Thursday, December 29, 2011

The best for last


These two are my favorite.

Cards were made using Paper Lovelies January's kit.
I believe the kit is already sold out.
Kit included:
Websters Pages - Winter Fairy Tales:
  • 12 Websters Pages double-sided 12x12 papers
  • 1 Websters Pages 12x12 diecut paper
  • 1 Websters Pages Storyteller alpha sticker sheet
  • 1 Websters Pages 8" bling strip
  • 2 Websters Pages Sentiment fabric tickets
  • 2 Websters Pages 12" bloomer trims
  • 2 Websters Pages feather flower
  • 2 Websters Pages pins


Wednesday, December 28, 2011

January's kit


Paper Lovelies has yet again put together another beautiful scrap booking kit!
For $15 you get coordinating paper and matching embellishments to go with it.
How great is that?

I'll have more cards to share tomorrow.

If you would like to see previous kits that Paper Lovelies has offered and kit ideas go here.
I do believe she has already sold out of January's kit.
I've said this before, quantities are limited and these kits go incredibly fast.
Each month the kits are released on the 25th.

Tuesday, December 27, 2011


Today we say good-bye for now.
We don't know how long he will be gone or when he will be back.
 Ryan took a job building ice roads on the North slope and flies out this afternoon.
Yesterday and today have been spent gather and packing Ryan's gear.
Yesterday I was feeling a bit overwhelmed by all of the unknowns & the responsibility that I will have holding done the fort.
I know I am capable and will be just fine.
He has gone and done this once before.
We are truly blessed to live around family and some really great friends. I may will need them.
I have to just think of each day as it comes.


I'll be back tomorrow.


Thursday, December 22, 2011

Cricut Card Thursday

I was inspired by this gift bag and challenged myself to make a snow globe card.
My take of the gift bag.

 Now to make your very own snow globe card.
Items needed:
Christmas cheer cricut cartridge, white, green, brown, gray & blue card stock, a Christmas sentiment stamp, red ink, Buffalo snow & glitter.


Load a piece of 12 x 12 white card stock into your cricut.
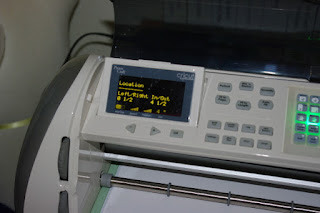
You will need to use your arrow keys.
On your screen you will see In/Out & Left/ Right.
Using your arrows move your blade housing so that your screen reads:
In/ Out: 4 1/2inches
Left/ Right: 1/2 inch.
Select the globe & cut at 4 inches.
Do not unload your mat.
Now move your blade housing to sit at:
In/ Out: 4 1/2 inches
Left/ Right: 6 inches
 Now cut globe again.
I usually will select the 'repeat last' button so that way I know I am cutting the same image again. This will eliminate accidentally hitting the wrong image. 
Unload mat.
You will now have 2 snow globes that are cut perfectly aligned and spaced.

You will want to cut your paper next.
Measuring from the left side cut at 8 1/2 inches.
Measuring from the top cut at 11 inches.
You then will cut between the two, measuring from the top and cutting at 5 1/2 inches.
Fold each piece in half to create your card base. The globe will be in front.

Stamp Christmas sentiment below snow globe.

To cut tree select <tree1>. Load green card stock, cutting tree at 2 inches.
To cut reindeer select <reindeer1>. Load brown card stock, cutting reindeer at 2 inches also.
To cut snowflake select shift then <snowflake>. Load blue card stock, cutting at 1 3/4 inch.
Repeat snowflake cut.


Now taking a piece of transparency cut it at 4 by 10 inches. Fold it to make a 4 by 5 inch rectangle.
Unfold. Using move able tape, tape to inside of card. Make sure your fold is to the bottom of card. This allows you  to see where your images will sit inside the globe. Glue images in place.
Fold transparency closed and tape along two longer sides.
Fill will Buffalo snow and glitter.
You can also use very small or crushed beads. They would move around better inside your card.

Tape top closed.

Place on inside of card front and tape top and bottom.
Cut a piece of gray card stock at 4 by 5 1/4 inches and place over transparency and adhere.

You now have a beautiful snow globe card.


Wednesday, December 21, 2011

Last peak

before January's Paper Lovelies kit is released.


Yesterday I searched every where for one of the last gifts. We were gone for 5 hours and we made 6 stops. The kids did wonderful! I should have known... They were so hyper last night, I felt like these walls were going to close in around me, and they did not sleep well either. I did however find a gift with Ryan's help. It is not what I had in mind but it works. 

Tuesday, December 20, 2011

Another sneak


I keep telling myself that after Christmas life will slow down, just a little bit.
My husband says that for me life will never slow down.
He may be right.
I like to keep myself busy.
He probably doesn't want to see me not busy.

Are you done with your Christmas shopping/ gift making?

Monday, December 19, 2011

Here is a sneak peak of what is to come..
I once again have had a lot of fun putting together my cards!

Let me tell you Paper Lovelies kits are awesome!
They go really fast and quantities are limited.

January's kit will be released on Friday the 23rd.
Normally they are released on the 25th of each month.

On Friday you will be able to purchase a kit or see what the all of the design team members have put together using their kits here. For ideas click on kit ideas tab.

I will have a couple more sneak peaks through out the week.


Other ramblings:
I don't want to jinx myself but I have been getting a lot accomplished during nap time and after the kiddos are asleep.

My Christmas tree crashed over sometime between 9:30pm and 1:30am. I found it's side at 1:30am. I lifted it back up, mopped up all the water and went back to bed.
This morning I found lots of broken ornaments, along with a broken angel and a dust pan full of needles. I'm glad that I was up with the baby, and with it enough to think to dry the floor, otherwise the floor would have swelled and been wrecked. Now every time you walk past the tree you can hear the needles dropping.  We had to open 2 Christmas presents that might have been damaged due to water. 

Naomi will now only have to go to physical therapy once a week instead of twice.

I mailed 2 boxes on Friday morning and heard from my mom this morning they had already gotten theirs. Haven't heard about the other one.

Need to resend a few Christmas pictures 1 that didn't get stamped and others that addresses weren't correct.

I only have 5 more days to help Santa find 1 of his gifts.

My sisters-in-law are on school break. Might need to hire them one day this week to finish up the to do list before Christmas.

Friday, December 16, 2011

I told myself I was only going to sit down and get online while the 2nd pot of coffee is perking.

The To Do list is long.
I love when I get to cross off items completed.

Yesterday I finally tackled & cleaning my craft room. Again.
If you know me I am always doing this! Mostly to fit yet another good deal!
I think I finally re-arranged, so the kids can be in there with me.
I wrapped and mailed 10 Christmas presents today. -whew!-
I absolutely detest standing in the post office line. Click and ship at the postal services web site is so nice! If you saw me at the post office today you might have seen my huge grin on my face when I walked past the long line of people and dropped off my already labeled packages.
7 of which were homemade. *big smile* I'll share photos once they have been opened.


As of late I have been working best under pressure or when the deadline fast approaching.

On the to do list is to mark the calendar for next year to start earlier!

Coffee is done.

Now to do a few fast and easy items to make the list a little shorter.


Thursday, December 15, 2011

Cricut card Thursday

I made this beautiful penguin card using Christmas Cheer.
Supplies needed:
White, black, red, brown & orange cardstock, 3 different colors of blue cardstock, white gel pen, Red & frosted lace Stickles, white liquid applique’ & Embossing heat tool.
Make card base to measure 5 ½ wide by 4 ½ tall.

Cut your 3 pieces of blue cardstock:
Small piece to measure 5 ¼ by 1 ½.
Medium piece to measure 5 ¼ by 2 ½.
Large piece to measure 5 ½ by 3 ½.

Tear each piece to make it look like drifted snow. Sand edges to distress.
Attach to card

Stamp snowflakes in the sky
Apply frosted lace stickles on top of stamped snowflakes. Set aside to dry.

Now cut & glue your 2 penguin together.
The smaller penguin is 2 ¾ inches tall and the big penguin is 3 ½ inches.
When cutting out your pieces for the penguins make both cuts while you have each color loaded into your cricut eliminating extra time loading and unloading your mat in the cricut.

1st load white cardstock into your cricut.
Select your blackout button & then the penguin button. 1st cut at 2 ¾ and then at 3 ½. You are keeping the outline of the penguin.
Next select the shift button & then the penguin button. 1st cut at 3 ½ since your already at this size then 2 ¾. You are keeping the rim of the penguin’s hat.
Unload mat.

2nd load black cardstock into your cricut
Select shift button & then penguin. 1st cut at 2 ¾ and then at 3 ½. You are keeping the outline of the penguin.
Unload mat.

3rd load orange cardstock into your cricut.
Select the shift button & then penguin. 1st cut at 3 ½ and then at 2 ¾. You are keeping the penguin’s feet and nose.
Unload mat.

4th load red cardstock into your cricut.
Select penguin. 1st cut at 2 ¾ and then at 3 ½. You are keeping the penguin’s hat.
Unload mat.

Make penguin's eyes using a white gel pen.
Attach penguin to card.

Stamp sentiment on light brown cardstock and trim to make a small square.
With dark brown cardstock cut a small piece to make sign post.
Attach to card.

Using white liquid applique’ make a small line along the edge of the penguin’s hat, under the feet & to the top of the sign and base of post. Heat liquid applique’ with embossing heat tool to make it puff like snow.

 Make the penguin’s scarf using red stickles.
Apply frosted lace stickles to the penguin's belly. 
Let dry.  


Wednesday, December 14, 2011

Early appointment

How come it seems like that when you do decide to take the early morning appointment, your fighting with kids that have WAY too much energy to go to bed?
I decided not to go to bible class this evening and make sure the kids were tucked in extra early. Like that really ever happens.

We have to be up and at the dentist office for just after 8am.
This is typically what time my kids have been getting up around here.

I hope the morning will go smoothly.

Due to the appointment I'll be posting my cricut card later in the day.

Wordless Wednesday

Tuesday, December 13, 2011

Tips, Tricks & Techniques Tuesday

I really like the font of this 'happy birthday' stamp. The only problem is that the words sit on top of each other and I needed a sentiment that didn't.
This works better when using clear stamps but you can use wood mounted stamps also.


I wanted to figure out how I could still use this stamp.


I first put a piece of scrap paper below where my sentiment was to be stamped. I then aligned where I wanted my 'happy' to sit & stamped.


Then I moved my scrap paper above where my sentiment was to be stamp.  Aligned my 'birthday' & stamped.


Now I had the font from the stamp I wanted, in the spacing I wanted.


Monday, December 12, 2011

Mission Accomplished

We spend the weekend away from home.

When we got the invite for the company Christmas party Ryan is working with we started making plans.
  • Spend some family time together.
  • Stay the night in a hotel with a pool.
  • Go thrift store shopping.
  • Ryan take his CDL permit test.

Mission accomplished!


I hardly picked up the camera. Ryan snapped a few.
Enjoyed playing and having fun with the kids.
The kids had a blast in the pool.
AK residents I recommend the Hampton Inn. The pool was really warm.
I found 1 treasure from the thrift store to re-do.
After all the cramming Ryan did this weekend his hard work paid off
and he passed the CDL permit test.


Today will be a low key day recouping from the flu. Nolan & I were plagued with it last night. It seems like a quick bug. Nolan has already bounced back. I think with the lack of sleep it will take me a little bit longer. Now that everyone in this house has gotten it lets hope we are done with it.

Friday, December 9, 2011

They are out to get me

I've started to wonder... 

 I have an amazing and a very smart family.
 My husband and kids have the ability to read my mind.
Every time I EVEN think I might sneak some time in crafting they plan differently!
I really think they are out to get me. wink wink 
I even thought I could out smart them but nope waking early didn't work either...

I dearly love them and they do come first and for most.
 But honestly feel like I could hire a babysitter just to get a couple hours of straight crafting time in.

DIY Cupcake liners flower

I saw a picture of these cupcake liners made into flowers and knew right away
 I wanted to try make them.
So I started digging to see what kind of liners I had.
My color selection didn't come near to how cute the ones I saw were.  


You will need 7 cupcake liners.

1. Take and flatten 4 liners and glue centers together. Make little snips all the way around the circle.(Only cut the side of the linear. Don't cut into the center.)


2. Place the 5th cupcake liner (don't flatten this one) into the center and glued down.

3. Take liners 6 & 7 and cut center out. I also trimmed the edges down also. Roll these 2 together to form center of flower. Glue down. I used 3 in 1 glue to glue  center. Hot glue will also work.

4. Crunch and fluff the edges.


I like how it is a chunky full flower, with items you would have at home.

The 2nd one I did had a foil lining. It didn't lay as nice and was harder to get it to
fluff up the way the 1st one did. But I do think it was a lot cuter.


Then, of course, I had to make cards to put them on.


Tuesday, December 6, 2011

Reindeer & snowman

Today was a make craft day

We made reindeer from candy canes

Items needed:
2 candy canes
1 pom poms for the nose
2 googly eyes
brown yarn

We taped the 2 candy canes together, then wrapped them with brown yarn. Next we hot glued the eyes and noses on.

And Snowmen from marshmallows


Items needed:
1 stick to build snowman on
3 marshmallows
1 pretzel stick broken in half
1 orange sprinkle for nose
2 brown sprinkles for eyes
3 colorful sugar balls for buttons

To make eyes, nose and buttons stick use a toothpick to puncture a small hole in marshmallow. This will allow you to place the sprinkle in the small hole and there will be a small amount of stickiness to hold it in place.

Total we made 35 reindeer & 24 snowmen. Came up 1 short of meeting the goal I had in mind.

3 months

The last 3 months have flown by and this big little girl has grown so much!


Evelynn you have brought so much joy to this house!
At 3 months you love to be cooed at and coo right back. You are quick to smile at us. You even sometimes can giggle and scare yourself with the sound.
You are starting to almost sleep through the nights.
You are very hard to take a picture of because you are always moving.


You have been our smallest baby at birth but one to grow the fastest.
 You are ultra sensitive when your mother has dairy of any kind.

You are loved by your siblings. Your brother loves to help out and sometimes a little too much.


Monday, December 5, 2011

It's beginning to look a lot like Christmas...

Over the weekend we were busy decorating the house.
Sure is looking mighty festive around here.
We still have the tree to decorate.


Jack the elf has returned.


Nolan's imagination is the best! At bed time we always get one on one time to snuggle & say prayers. This is also when Nolan will share what he learned in Sunday school that day or things he might be seen or had been thinking about that day.
Last night he was full of questions about the elf.
He has decided that Jack the elf must play with his toys while when we leave the house. How can he just sit there ALL day, not talk or even play!