Thursday, March 29, 2012

Make a wish

Card base measures 5 1/2" x 4 1/4".
Stamp candle base on 5 different pieces of pattern paper. Trim and attach to card.
Stamp candle flame on yellow cardstock. Trim and attach to card.
Stamp sentiment.

This stamp set is from Stampin up. Big birthday candles.  I believe it's a retired set.

Wednesday, March 28, 2012

Road trip

We started the drive to Fairbanks while the sun was beginning to rise, Monday morning. It's a 5 hour drive.
Nolan sure had us laughing. He was quite concerned with how long the drive was taking. Or in his words: "How come this is taking forever!"
What a beautiful day! Clear skies allowed us to view Mt. McKinley.
Once we arrive, we located the hotel, then set off to spend the rest of our day with family.
The kids had such a blast playing together! Evelynn was, like always, a hit and had many hands that were willing to hold and love on her.
This mama was a little sleep deprived, a little cranky and just ready to be home in my own bed. But before leaving we stopped to see the ice sculptures. It was well worth the stop!
We walked around looking at all the amazing talent.
I went back out to the car to get snow pants, so I too could join all the fun of sliding down the ice slides.
Love how it was fun for all ages.
They did have a skating rink that you could use their skates and skate. We attempted but my kids have this bad problem of not wanting to wear socks inside their boots. So, even though we probably could have rounded up some socks in the car, I wanted Nolan to learn from this. He was very indeed sad. 
 
Definitely something worth heading back for every year!
I would have to say it was the perfect way to conclude our travels. We were able to stretch our legs and get lots of fresh air before making the trip back home.

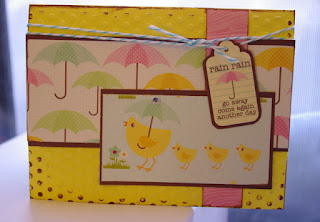
Rain Rain go away

Card base measures 5 1/2" x 4 1/4".
Emboss card front with a dot embossing folder.
Cut 2 pieces of brown cardstock. 1st one to measure 5 1/2" x 2 1/2". 2nd one to measure 3 1/2" x 2".
Out of pattern paper (pink) cut a strip at 3/4" x 4 1/4". Ink and attach to card.
Out of pattern paper (umbrella) cut piece at 5 1/2" x 2 1/4". Attach to cardstock and attach to card.
With your next piece of pattern paper (chicks) cut 3 1/4" x 1 3/4". Attach to cardstock and attach to card.
Ink around card edges. 
With sticker tag, put on brown cardstock. Trim around edges.
Wrap twine around card twice. Before knotting, slip tag on twine. Knot.
Place a small amount of glue to hold tag in place.
Attach rhinestone to top of umbrella that the mother chick is holding.

Tuesday, March 27, 2012

Another slumber party

My cousin Alyx has been with us the last couple days.
She came with us to Fairbanks to see our aunt & cousins.
It was so nice to see them and to have another adult along with to help out!
I'll post more photos of our travels later.
I can't say she has received much sleep though.
Sunday night Noami crashed off my bed. Poor thing!
Many tears were shed along with lots of crying.
She does have a couple battle wounds to show for that one.
Monday night was also rough. Noami again had difficulties sleeping.
With so many bodies crammed into a double bed, again limited sleep.
Tonight the kids wanted to sleep with Alyx in her bed. Oh dear. 
We came up with a better plan.
We hauled up their mattresses and they get to have a slumber party in the living room with Alyx.
We are all hoping for some much needed sleep tonight. 

Thank You

Card base measures 5 1/2" x 4 1/4".
Cut pattern paper to measure 5 1/4" x 4". Attach to card.
Punch a border from pattern paper and trim down to 5 1/2" x 1". Attach so top edge is the middle of card.
Cut pattern paper to measure 5 1/2" x 1 1/2". Ink and attach just below your border.
Ink all around your card.
Cut 1 rose from ribbon trim. Attach to card.
Punch 3 small butterflies and 1 large butterfly. Ink edges a little bit.
Using a pin attach large butterfly to rose.
Attach 3 small butterflies.
Stamp sentiment on pattern paper. Trim and attach.  

Monday, March 26, 2012

You crack me up

How to paper piece your stamped images:
Start by stamping your images on to your card base.
Next stamp your images on to pattern paper.
I wanted to piece the flower tops, the chickens & their shells.
Note that the egg shells and chickens are different pieces of pattern paper.
Next cut out each piece that you want to add to the blank stamp image on your card base.
Add twine and sticker heart.
You will have a completed beautiful card.

Saturday, March 24, 2012

Happy Birthday

This card includes paper piecing.
I'll share with you a step by step directions in a different post soon.
Card base measure 4 1/4" x 5 1/2"

Stamp banner on card base, twice with black in.
Color in the banner string with markers.
Stamp the first part of the sentiment directly on card base.
Stamp second part of sentiment on pattern paper. Trim. Glue to solid piece of cardstock. Trim & attach.
Now stamp the banner with black ink on 4 different pattern papers.
Cut out very close around as many banners as you need for the banners on your card base. Don't attach until you figure out your coloring and which one should go where.
Add rhinestone.  

Friday, March 23, 2012

Kids day part 3

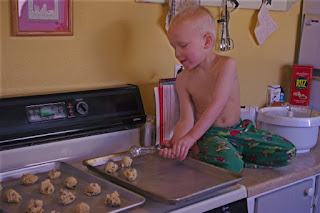
After another mess was cleaned up, we moved right along to make some chocolate chip cookies.
I started the dough. Nolan insisted on helping, he measured and dumped the flour in.
He also scooped and put most of the dough balls on to the pans.


I ended up doing the last few pans.
They turned out delicious!
Nolan's interest were now on entertaining his little sister.
She just loves him!
It was full day but extremely fun!

Birthday wishes

With spring just around the corner -I hope that is, That means many family birthday days. April's kit from Paper Lovelies was so nice to make a few birthday cards. I love the colors of the paper!
Card measures: 4 1/4" x 5 1/2".
Cut a strip of pattern paper that measure 1 1/2" x 5". Round 2 bottom corners. Ink & attach to card base. 
Take a small paper dollie, cut inside out.
 Find something that is roughly 1 3/4" and trace with pencil. Then cut.
Punch a 2" circle out of pattern paper and glue in the space you just cut out of the dollie. Attach to card. Trim edges of dollie that over hangs. 
 Punch a 2 1/2" circle out of a different pattern paper. Ink and attach.
Stamp sentiment.
Attach flower & rhinestones.

Thursday, March 22, 2012

Last peek

Tomorrow Paper Lovelies will reveal it's April kit.
Adds a splash of color to the spring fever that is starting to creep in around here!
If you go on Facebook, Like Paper Lovelies' page and then leave a comment to be entered in for a chance at a $10 gift card to Joann's.

Kids day part 2

After we cleaning up our peoples mess.

The kids play with play-doh...
Eek.
I don't really care for play-doh.
Think it makes way too big of a mess.
The last time we did it some how, no one knows how, but it ended up in the carpet.  No big deal right? We just had to wait until it dried nice and hard and then chiseled it out. 
I believe I set the kids up to play and then tried to supervise while baking in the kitchen.
Bad idea.
This time I sat and played took pictures of them.
It was pretty fun!

Kids day part 1

So as much as I feel like I need a little time to myself, my kids have been speaking in great volumes that they needed some extra mom time. So this week, for one day, we put aside the laundry, cleaning and all the other chores of a single mom, to spend almost the whole day doing fun activities that we don't normally do.

We started by making people for our wall.
To make, gather up some plain paper (tape it together if you have to), tape, scissors, pen, wrapping paper, construction paper, googly eyes, markers and glue.

Once taped, trace around child.
the line is sort of faint here

Next cut out around the outline. Take your glue and glue around where the pants would be and stick wrapping paper down on top. Smooth. Flip and cut out around the legs.
Now glue around where your shirt would be and stick wrapping paper down on top of this. Smooth. Flip and cut. It's okay if you have to piece the wrapping paper.
Now take your construction paper and add shoes, hands, face and hair.
Nolan really thought he wanted his person to have green hair. But I was able to have him pick a color that best matched his own.
Let the kids draw their own faces and glue eyes down.
Love Nolan's nose. It's right between his eyes.
Then hang on wall for kids to admire. :)
This is more for kids ages 4+. Naomi didn't help in the way of making her person. :) But had fun being included nonetheless.
Stay tuned for more of the activities that we did that day.

Tuesday, March 20, 2012

Sneak Peek

On Friday the 23rd, Paper Lovelies will be releasing it's April kit.
Want to make sure you get one? Head on over to their site Friday.
Yay! It's such a fun & bright kit.
It's just what we I need here in Alaska.
Yes, the sun is feeling a whole lot warmer. But we still have piles and piles of snow.


Oh, have you gone on Facebook and liked Paper Lovelies there?

Wednesday, March 14, 2012

Leaving foot prints

in my heart.
I don't want to wash them away because seeing these chalky foot prints on the floor make me smile. 
At moments like these I find myself stepping back to watch my children learn & grow.
 I am yet again reminded of the all joy that they have brought in to my life.
I wish I could stop time.
I want to bottle up the sound of their laughter bouncing around this house, 
so I can up unscrew that lid and hear their joyous laughter come floating out.
Or make a blanket with their happiness sewed into it, 
so on a trying day where I doubt my job and skills as a mother,
 I can wrap myself around that blanket for comfort.   
I want to cherish and remember the little moments that often go unseen.
But most of all I am thankful for the blessings that fill my days!


Tuesday, March 13, 2012

Ten in a Day

Community.  3.13.12

Do you remember me saying that I still like the challenge of taking pictures, but not a photo a day?  So, instead of doing a photo a day, my aunt Anita and I came up with 10 in a day. We made a list of 10 things, since we have 10 remaining months this year, and we can draw one out of the hat or just choose one each month to focus our 10 pictures around.


I hauled my camera with me today while in town doing errands. The problem I find is that the camera feels clunky and awkward out in public or at a get together. So this was a great challenge for me to help feeling more comfortable behind the lens. Also for me to learn how to use the camera more.. so I can justify a purchase of a bigger lens. But that has to wait until our van is paid off.
Anita has already taken her photos and if you would like to view them bop on over to her blog here. 

Our list includes:
Backyard
Kitchen
Living Room
Car
Community
You
Family
Shades of Light
Pick a Color
5 Senses
Will you join us?

Friday, March 9, 2012

You make my world card


Cut card base to measure 4 1/4" by 5 1/2". Punch a 3 inch scallop circle. Write sentiment around outer edge of circle. Stamp or draw a line for pin wheels stem. Cut a 3 1/2" x 3 1/2" square. Cut a diagonal line from each corner towards center leaving a small space in the center. Pierce a hole on the left of the 2 pieces in each corner & in the center Now take each piece that has a hole pierced in it and bring it to the center. It should be every other pieces. Hold each piece down in the center with a brad.  

Thursday, March 8, 2012

I have the world's best

Husband.
He has always put mine and our kids needs before his own.
After getting home from 10 wonderful days of soaking up the sun, relaxing, visiting, and shopping I came home to a spotless house. He vacuumed out my extremely disgusting van & washed it. And then to top it all off he left me half a dozen roses on my night stand with a note telling me he misses me and love me. How sweet is that!
He is back to work away from home again. He did get laid off shortly before I left for Arizona. He got a call while I was gone, they needed someone who knew how to run and could possibly fix a sno cat if need be. He didn't have very much time to make a decision regarding this position. He did take the job and they estimated 4 weeks that he would be gone. Ugh! We missed each other by 36 hours.
Oh, I should add he purchased a new shovel for me so if we get more snow that I'd have something to move it with. :) What a guy.
I hate to admit but I'm really glad he did. I woke the morning after getting home to 5 inches of fresh fluffy white stuff. The shovel does work really well. The part I did shovel took me 25 minutes instead of close to an hour. Then my wonderful brother was over that evening and offered to move the rest of the snow.

Wrapping up

my February picture a day...

21. a fave photo of you:
22. where you work:


23. your shoes:
24. Inside your bathroom cabinet:
25. green:
I didn't pictures from the last 4 days since I was a little side tracked with the sun, warm weather, services and visiting in Phoenix.

I really enjoyed the challenge of trying to get a picture a day. Although some days it felt really hard to find the time or to try use the camera to it's capabilities.
While in Arizona visiting, my aunt Anita and I decided that we like the challenge to take pictures using our cameras on the Manuel setting. Sometimes the photo a day is hard due to little ones for me. We came up with one idea or focus for each of the remaining months and want to challenge ourselves to take 10 pictures of each idea. I didn't copy the list of these ideas for myself and will have to get them from her.