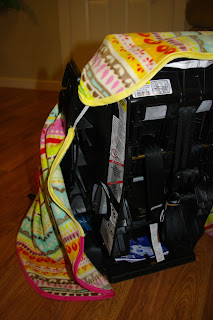
I know some may be concerned about safety while using a type of blanket in a car seat. I did some reading up on car seat safety before posting this. Seriously? I think some have taken it a little too far. Some sites went as far as saying that you should buckle your child into their car seat without their jackets on, then put their jacket on backwards after they are buckled up. I understand that you want your child to be safe while riding in the car. And that you want the buckles to be as close to their bodies as possible so if, in a collision they are as secure as possible. Got it.
I felt that living in extreme temperatures that Alaska can have, my child being warm is just as important. I found that blankets are a must when the weather is cold. Let me tell you when your in the grocery store for about an hour and the weather is below -20, the car cools off fast.
So I'll let you decide on your child's safety and I'll decide on the safety of my mine.
Last year black Friday shopping I picked up this fleece with the intent of making car seat blankets. And never got around to making them.
So while our weather is fairly warm at the moment, and knowing we have many more months of winter. I decided it was time to dig out the fabric and make them.
I searched online for a nice, already done tutorial but couldn't find one that I liked. So I took some pictures of how I made mine.
Step 1: cut fabric. For a toddler seat you'll need just under 1 1/2 yards of fleece.
So I don't have a perfect pattern for you, just some measurements to go off of, you'll have to wing it a little bit.
Step 2: Open up you fabric and put it inside your car seat. I marked the top of mine with a pin before I opened mine up. Smooth it all flat and feel for where the buckles are at. Grab a pen and draw a line where each buckle is. I had 5 total.
Step 3: Take a pair of sharp scissors and cut along your pen lines. These cut only have to be about 1 1/2". Also on each end make 2 smaller cuts, sort of at an angle. Don't make them very big. Only about 1/4". You are wanting to create 4 small sides to you cut. Repeat 4 more times.
Step 4: Flip your fabric over. Tuck each of the small flap to your opening under and top stitch around the opening. Repeat 4 more times.
You now should have something like this:
Step 5: I added a piece of elastic on the top to hold it from falling into the car seat. If you want to do this also, put your fabric back into your car seat. Put a small pin to mark where the elastic should be on each side.
Step 6: Sew on your bias tape. I used 2 packages. I pieced the bias tape before sewing it to my fabric.
I was determined not to have to go out and buy anything for this project, and use what I had on hand. Each of blanket have 2 different colors.
You want to start sewing so that your elastic is added at the end. When looking at your piece, the top is up, start just below the pin on the right hand side.
When you come to your 1st pin tuck the elastic into the bias tape. It will be underneath your fabric if your top is up. I back stitched over mine to make sure it wouldn't come undone with the extra force that I'm sure will be added to it. Now make sure you don't catch the elastic when your sewing to your next pin.
When you get to you next pin, put your needle down. Find the other end of your elastic and tuck it into the bias tape, back stitch.
Step 7: Finishing off. To finish off I stopped about 6 inches before I started. Put your needle down. Open up your bias tape and tuck the cut end in about 1 inch. Then fold your bias tape back together. This way all your raw edges are not exposed.
Finished car seat blanket!
Happy girl excited about her new blanket.
All bundled up.
The 2nd seat I have is slightly different is style. I had to add two pieces of elastic for this one.
2nd happy girl who loves her blanket and likes to haul her blanket every where!
Now I'm a happy mom who doesn't have to haul blankets in and out of the house to car. This will cut down a lot on the laundry! I'm forever washing blankets that slip off and boots that drip on them.


Hey, another perk to these car seat blankets - you don't need to struggle to take off (and put back on) the carseat cover when it needs to be washed, you just wash the blanket!
ReplyDeleteLove these. I've been wanting to do one for Jack for some time. Great job.
ReplyDeleteHello, I've just clicked over here from somewhere and had to say these are a great idea! Although, what with me living in Australia and all, I doubt I'll ever have a use for them! Kellie xx
ReplyDeleteYou could easily use the same fleece to make snuggies to put on after the child is buckled or even better a carseat poncho that can be lifted up to buckle and unbuckle. The child can even leave the poncho on as they get out. Both of these ideas keep the child warm witbout interfering with the safety function of the seat.
ReplyDelete